26 August 2012

Polymer clay Plumeria Flower tutorial

EDIT!!!!: This tutorial is now out of date! I've re-made this tutorial. You can find the up to date version here.


These flowers are super easy to make. All you need is some clay in one colour for the petals, a craft knife/blade, colourful chalk pastels, a paint brush and a teaspoon (preferably one you don't need for food!).


Shaping the petals 
You'll want to start by rolling out the clay. You don't need to use bright pink clay, of course, but I've made them in a lot of other colours already.


Cut the clay in to five pieces, they don't have to be the exact same size, but make sure they're pretty much the same size. Now roll them in to little balls, they don't all have to be exact.
Now for the teaspoon :D You can use a dessert spoon if you're making a bigger flower, but again, make sure you don't need it for food!!!
Use it to squash down the clay and use your fingers to shape it in to a petal.

Note that it doesn't have to be a perfect petal shape, no flower is perfect!


Now you should have this shape :) You need to repeat it on all of the other petals. If you want, you can make a six petal flower or a four petal flower. Just make more petals now :D You can make as much as you like, but I like the five petal flowers the best.

If this technique isn't working for you, you can get petal shaped cookie cutters. Just roll out the clay and cut out your petals. Shape them and you'll get a similar effect. I don't use cookie cutters for clay though... I see it as cheating, to be honest :)


Adding another colour

You could just put the petals together to make the flower shape now if you want, but I like to use chalk to add another colour. You could also bake your flower now, then use acrylic paints. However, they leave a shine and flowers aren't shiny!
Take a scrap piece of paper and get out your piece of chalk and craft knife/blade.

Use your craft knife to scrape some chalk on to the bottom of the petal (the narrower part)


Now use your paint brush to spread the chalk so that you get a gradient effect.


Repeat on all the petals.

<


Making the flower shape

Now for the easy part :)


You can add some TLS/liquid clay to help the petals stick together.


Now you need to lay the petals over each other so you get the plumeria flower shape....


You could add a little more chalk, or add another colour, at this point. You could also add an eye pin (depending on what you're going to use it as). If you want to add one, put a little scrap clay on the back and put your eye pin through that. DON'T put it through one of the petals!

Now bake according to the instructions on the pack. I used Fimo clay, so I baked it for 15 minutes as it's only a thin piece of clay. As for the temperature, I live in the UK  and have a gas oven, so my oven doesn't use the same temperature as the US ones... I cook mine on gas mark 1/2 or 1.

Suggestions...

I've made these in lots of colours. The most effective so far that I've made are using white clay. I wanted to try it with the pink, this time! Try white clay with blue, pink or yellow chalk. If you want, use two colours. I also tried yellow clay with red chalk, and that came out really well.

Also, you could add little rhinestones, like on this one. They look a little like water droplets ;)


That's all, then :) My first tutorial lol XD! Next time, I'll try and make a shorter tutorial, but I wanted to get lots and lots of detail in.


You can find my new updated tutorial here.


24 August 2012

Hi :)

I have been making things... But today I don't feel like making a post about the stuff I've been making... So don't read this if you only care about what I've been making and stuff...

Anyway, I got my GCSE results yesterday :D They're all great! :) :) :) I'm really happy! Although, I'm a bit jealous of the people doing their GCSEs next year because apparently they're making the courses more based around exams rather than coursework... And I HATE coursework (unless it's art coursework!). I always do better in exams than on coursework! 

Since I did so well, I can go to the Sixth Form I wanted to, so I'm double happy XD I hope I do really good on my A Levels! 

Moving on, I've been drawing Manga lately :) I haven't been drawing it for a while, because I got a little tired of it... I used to be a complete Japan-obsessive/nerd/whatever you like to call it, but now I love Japan, I'm just not obsessed any more. I mean, I used to think that I was supposed to have been born Japanese, but now I'm fine being European. Plus, I don't annoyingly say 'Kawaii!' all the time. It seems a little bit racist now... Especially since I have friends from Hong Kong... 

I'm planning to make a slideshow with some of my more recent manga on it :) I'd rather not dig out my old drawings :( A lot of them have deep meanings only me or my closest friends know. Most of my new ones do too, but I don't care so much. 

I feel like giving this Blog a bit of a make over, well I have done since I made it, but I think I'm actually going to do something this time...

Another thing is... I managed to change Google Chrome's language setting so I don't have to speak American English any more!(Not that I did previously) Yep, that's my rant over.

19 August 2012

Millefiori canes

I've been watching Italian polymer clay videos lately! There are some Italian girls on YouTube that are pretty much perfect at making canes and jewellery...

Anyway, I've been inspired :)
Here are some of the Millefiori canes I've made. You can't exactly see them very well in this picture. They're not nearly as good as some of the people I've seen... But they're a start, I guess (and they're better than my very first canes).

I made the one in the middle quite a long time ago, actually. I made the other two on Tuesday and Wednesday...


I haven't put a cord on this yet...


I also made these pendants and earrings using these canes :)
Anyway, these are pretty straight forward to make, and you don't have to just use Millefiori canes to make them. You can use fruit canes too :) So if you only have fruit canes, and you don't want to make anymore, I'm sure it'll look great using fruit canes. The only problem is, if you bake your canes, it might not work. 

What I did was, I made my cane, then used the waste clay from making the cane to make the shape of the pendant/bead/earrings. Then I took slices from my canes and put them on the pendant, and used a rolling pin/rolled them so the slices looked like they were part of the design. Then I baked them and made them in to the jewellery :)

If you're interesting, have a look at these YouTube channels (sorry the channels are Italian). SweetBioDesign and MissiClaus. I suppose those two are like the best I can find right now since my computer's being slow...


13 August 2012

More biscuits

I couldn't put all my polymer biscuits in to one post... Because I was too lazy!

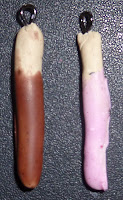
Half dipped biscuits/cookies


My sister made one :D
These aren't exactly my idea because I saw a video on YouTube showing how to make them. I kind of came up with my own versions... But there isn't exactly lots I can do with this idea (I'm too lazy). I suppose something I could do is make them in different shapes and stuff...


Pretzels

No, they're not exactly biscuits. But I had the idea to make them while I was making polymer clay biscuits and the ones I made are more like biscuits than pretzels.

I made them in lots of colours, so chocolate, strawberry and vanilla flavour :) I put some 'icing' (TLS) on them so they look half-dipped and put on some sprinkles (Because sprinkles are good).

I can't exactly explain how I made the knot shape of the pretzel... I might make a pictorial tutorial later... If I can be bothered, that is XD


Anyway, I decided to take another picture of my 'Sandwich biscuits' from a different angle.
Heart shape on the top, of course :)
Now you can see the different colours (or flavours if you prefer) in my biscuits :D

Anyway, I keep getting ideas lately... So I might update a little more often... I feel like taking a break from polymer clay, actually, but I keep getting ideas for things. So it's hard :( I might make some jewellery out of paper, like origami and paper beads.

By the way... I'm soooo fed up of the spell checker on here. It keeps forgetting I'm NOT American and telling me off for spelling things the British way :( Sorry, but it's annoying!

12 August 2012

Polymer clay biscuits

Sorry, I'm British so cookies are biscuits to me :) Anyway, I've made lots of them because they're fun and easy to make. Anyway, I understand that in places like America, some of these biscuits might be called different names.

'Sandwich' Biscuits

I never know what to call these biscuits so I just call them 'Sandwich Biscuits' because it's just basically two layers of biscuit (or clay) with a layer of filling inside (TLS/liquid clay mixed with chalk).

Yeah, I forgot to take a picture from the side so you can't see the bottom layer is a different colour. Anyway, basically what I did was on the first one (the smiley face one) I used a plain biscuit base with a red filling, and then cut the smiley face shape out of the top layer. I stuck it all together and it came out like that :). On the others I did the same think, except with different colour layers, filling and shapes.

I don't know if it counts, but here's a different sort I made:
Yeah, I got brown TLS everywhere...
I think I did it wrong, I cut out a heart shape for the base (with a craft knife and a piece of paper cut in to the shape I wanted. I don't use cookie cutters!) On top of that I put a layer of brown TLS. This is where   it went wrong... I wrapped two pieces of clay around each other and tried to used them to outline the biscuit, but of course it all went wrong. I learnt my lesson. But it does look kind of cool!


Cookies!

Here in Britain, these are what we call 'cookies'. Biscuits with chocolate chips (or chunks or whatever) are called cookies. I don't know anyone who calls any other sort of biscuits 'cookies'. I suppose some kids call any biscuits cookies, but that's just because of all the American kid shows they show over here...

I guess the one in the top left corner doesn't really count as a cookie, but it's there anyway. (I suppose it falls under the category of 'dipped biscuit', but oh well)

I suppose plenty of people already know how to make cookies... So I won't go in to too much detail.

I just took a base of polymer clay and shaped it. Then rolled a ball of foil over them to give them their texture. (I don't know what Americans call foil, but I think it's different) I dusted them with chalk to make them look cooked, then added the chocolate chips and decorations.

Mikado/Pocky sticks

Where I live, we don't have Pocky Sticks. We have Mikado sticks. They come in lots of different flavours,but not as much as Pocky Sticks. My friend (who comes from Hong Kong) showed me Pocky. They're pretty much exactly the same as Mikado :)

Yeah, I soon gave up on these... I took a stick of 'biscuit' then rolled them in TLS. Bad idea. Mum angry at me for messing up the foil on the tray. (I have to use the same strip of foil for all my polymer clay. If I mess it up, I get in trouble for 'wasting foil'. I have a strange family...)

Anyway, I suppose I could have just painted them instead of using TLS. The only thing is, acrylic paints seem to leave a shine. The chocolate on Mikado doesn't really have much of a shine. I guess I'll have to come up with something...


I'm going to make another post about more biscuits when I feel like it. Now, I'm bored of writing and my sister wants to play Sims 3.

5 August 2012

Another scrap clay idea...

I was bored... So I made these hearts out of clay and put some fruit cane slices on them. :) I put some white chalk on them too, because it looks kind of like icing sugar, well too me it does ;D

They're pretty simple and they're quite small so they're good for charm bracelets. I might make some     earrings using this sort of technique in the future, I think it would look nice :)

Another thing is, I was bored of the shape of ordinary eye pins, so I made up my own. I get bored   way too easy... I was thinking of making some heart shaped ones, too.