
25 November 2012
3 November 2012
Toffee/candied/candy apples
This is probably one of the easiest polymer clay tutorials I've made so far :D
You will need light green polymer clay, a bamboo skewer or a toothpick, and wire cutters. To make the chocolate apple you need brown chalk and TLS (If you don't have TLS, you can paint it). For the toffee apple you can use watered down acrylic paint or clear liquid clay (such as Fimo Deko gel). In this tutorial I will be using the paint.
The apple
First, you need to condition the clay. Then roll it out and cut it in to equal pieces. After this, roll each piece in to a ball shape.
Use your wire cutters to cut a piece of your skewer/toothpick off. Push this in to the 'apple'. You will probably have to reshape the clay after this.
The chocolate
Mix brown chalk with TLS. It's very easy :) You want to do this on a scrap piece of paper, preferably one you've already used but don't need (Wasting paper is BAD!). Then, just dip your apple in it. Make sure it's nicely coated with chocolate, but leave a bit of green showing at the top.


You will need light green polymer clay, a bamboo skewer or a toothpick, and wire cutters. To make the chocolate apple you need brown chalk and TLS (If you don't have TLS, you can paint it). For the toffee apple you can use watered down acrylic paint or clear liquid clay (such as Fimo Deko gel). In this tutorial I will be using the paint.
The apple
First, you need to condition the clay. Then roll it out and cut it in to equal pieces. After this, roll each piece in to a ball shape.
 |
| Click to enlarge :) |
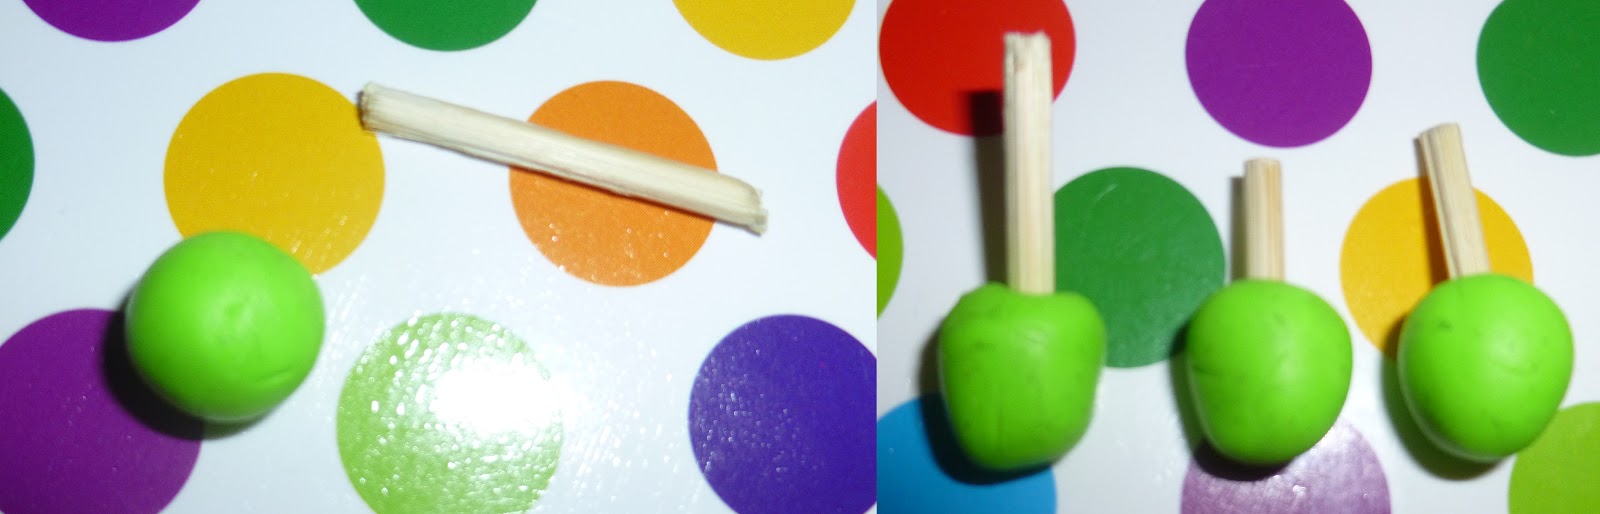 |
| Don't worry if it's wobbly, we'll sort that out after it's baked :D |
Mix brown chalk with TLS. It's very easy :) You want to do this on a scrap piece of paper, preferably one you've already used but don't need (Wasting paper is BAD!). Then, just dip your apple in it. Make sure it's nicely coated with chocolate, but leave a bit of green showing at the top.

If you're wanting to make a toffee apple, and you have fimo deko gel, now would be a good time to use it :) I don't have fimo deko gel, so I can't show you how. Sorry :(
 |
| Now you need to bake them according to the instructions on the packet. |
One quick tip... The wooden part will probably not stay in the apple after baking. To fix this, take the skewer/toothpick out and cover the inside and the wood with glue. Anything that dries clear will do :)

Toffee/caramel
You can also use this technique to make caramel, by using light brown paint. You want to water down some acrylic paint, don't add as much water as I did! Dip in your apple and leave it to dry.

NOTE: I haven't got any pictures of the finished product yet. Will upload them later in a separate post :)

2 November 2012
...
Yeah, I'm not sure what to call this post... Anyway, I haven't been in the mood to update this week. I've not exactly been myself lately. And my family has 'issues' with Halloween, lol!
One thing I'd like to mention, is the hurricane in America. I can't believe it's really happened. I thought the news people were making up stories, lol. Anyway, I've heard that the damage, especially in New York, is pretty bad. It's crazy, all the pictures we've seen on the news are the complete opposite to what people over here think of when they think of New York. I hope everything gets back to normal soon and that the damage to people's lives aren't that serious. I've never actually left the UK in my life (yet), and the worse thing I've ever seen is probably the flash floods and a relatively small earth quake that happened a few years ago, but nothing that compares to this. I can't imagine how people in America must feel :(
Anyway, on a more positive note, I made this necklace out of polymer clay because I love bats and it was Halloween!
 I was going to make a tutorial for it, but I noticed it was way too similar to other tutorials I've seen. It's pretty much straight forward, too. Just draw your image on paper, cut it out and use it as a stencil to cut out your clay. Done :)
I know that most other countries don't celebrate it, but it's Bonfire night on Monday :) To my family, it's A LOT more exciting than Halloween. If you don't know what it is, it's basically a festival to mark the day when the houses of parliament were almost exploded, but the people doing it got caught (hence the fact we burn a little model of a person on a Bonfire). There are firework displays up and down the country, and they never seem to stop exciting people :D The only problem is, people tend to go crazy letting off fireworks (not in a potentially dangerous way!), and so the dog goes completely mad!
One more thing: sorry I haven't made any tutorials :( I felt that everything I'd come up with had been done. But I'll definitely be making some more soon :D
One thing I'd like to mention, is the hurricane in America. I can't believe it's really happened. I thought the news people were making up stories, lol. Anyway, I've heard that the damage, especially in New York, is pretty bad. It's crazy, all the pictures we've seen on the news are the complete opposite to what people over here think of when they think of New York. I hope everything gets back to normal soon and that the damage to people's lives aren't that serious. I've never actually left the UK in my life (yet), and the worse thing I've ever seen is probably the flash floods and a relatively small earth quake that happened a few years ago, but nothing that compares to this. I can't imagine how people in America must feel :(
Anyway, on a more positive note, I made this necklace out of polymer clay because I love bats and it was Halloween!

I know that most other countries don't celebrate it, but it's Bonfire night on Monday :) To my family, it's A LOT more exciting than Halloween. If you don't know what it is, it's basically a festival to mark the day when the houses of parliament were almost exploded, but the people doing it got caught (hence the fact we burn a little model of a person on a Bonfire). There are firework displays up and down the country, and they never seem to stop exciting people :D The only problem is, people tend to go crazy letting off fireworks (not in a potentially dangerous way!), and so the dog goes completely mad!
One more thing: sorry I haven't made any tutorials :( I felt that everything I'd come up with had been done. But I'll definitely be making some more soon :D
28 October 2012
Halloween charm bracelet


I don't want to make any tutorials on how to make the charms because there are already lots of tutorials like this on the internet. In fact, parts of this bracelet were inspired by tutorials I've seen (I'm not going to lie)
27 October 2012
Polymer clay Halloween charms!
YAY! It's Halloween :) I noticed I got a CRAZY amount of hits when I made my last post saying I was going to make this, so I guess the pressure is on for me!
Warning: this post is NOT a tutorial! I'll be making a tutorial later!
This is basically a showcase of some of the polymer clay charms I've made to inspire people. I know by now people have probably made everything, but I kind of forgot to make this earlier in the month :( Stupid me.
Polymer clay Dolly Mixture
In real life I hate dolly mixtures, lol. But they're so fun and easy to make :) I'm planning on making these in to a charm bracelet.
Table with sweets on it (creative title lol)
 I had a bit of a creative moment and ended up making this :) It looks like the table at our house at Halloween. The reason why there's barely any sweets is because they all got eaten. (Actually it's because I couldn't be bothered to make any more. But if I say that, it'll ruin the moment.)
Scrap clay bats
 I made loads of these out of scrap clay and painted some of them. The one at the bottom I just covered with glue and stuck rhinestones on. One fell off because I touched it before it had dried (silly me). Don't even ask why I put two holes in them. I thought it looked good :) The one at the top is actually broken, I tried to put a jump ring through one of the holes and it just wasn't working. Me being persistent, I kept trying to push it through. Oops.
CAKE!!!!
 Just something I made with my sister :) It looks kind of cute though!
Completely unrelated to the subject: memory wire bracelet with semi-precious stones
The title says it all. Completely off topic! But it looks nicer than the other bracelet, ha ha!
More posts coming later. Now, I will browse the internet whilst looking bored XD
Warning: this post is NOT a tutorial! I'll be making a tutorial later!
This is basically a showcase of some of the polymer clay charms I've made to inspire people. I know by now people have probably made everything, but I kind of forgot to make this earlier in the month :( Stupid me.
Polymer clay Dolly Mixture
 |
| Don't ask about the chocolate bar. I went a bit mad, ok? |
Table with sweets on it (creative title lol)

Scrap clay bats

CAKE!!!!

Completely unrelated to the subject: memory wire bracelet with semi-precious stones
 |
| Don't judge me, it felt lonely! |
More posts coming later. Now, I will browse the internet whilst looking bored XD
8 October 2012
Memory Wire Bracelet
Last year I went to a continental market, and there was a stall there that was selling memory wire bracelets with silver plated beads. They were really pretty so it bought one, it was £8. It took me forever to work out how they made it :)


I eventually worked out that it was just beads on memory wire. It's super easy to make. In fact, I felt stupid when I worked it out, lol!
Never mind :)
Anyway, as I said, it's pretty simple to work out yourself. All you need is a few rings of memory wire and LOTS of beads. If you feel creative, you can try making the beads :D.

7 October 2012
How to make Ear Cuffs: method 1
I love ear cuffs :) They're so cute, and you don't have to go through all the pain and after care that comes with a real piercing. All you do is put them on your ear and you're done.
I thought of several different ways to make Ear Cuffs, each method requires a strip of wire. You can add on beads, chains... If your ear piercing is 100% healed (be careful... newly pierced ears rip easily) you can join it all together using studs or tiny hoop earrings and it'll look really cute and unique :D
 |
| My ears look so weird lol! |
In this tutorial, I'm going to show you how to make a relatively small cuff, like the one in this picture :)
Basically, all you do is make the design flat, and then use something round (such as a paint brush) to make it curved.
1. It's easier to draw your design out on paper first. Draw it in the way you want to make it. Curve your pencil around and DO NOT take it off of the paper. You might find you have to re-do it a few times :) But it will give you a good idea on how you want to make it. Tip: you want to start it with a loop and end it with a loop. You can make them whatever shape, as long as it makes a continuous loop that doesn't have any gaps. Remember, we start by making it flat.
2. Make your design.


And you're done :)
I'm going to make some more tutorials on how to make ear cuffs. I'll show you how to add charms, stud earrings and chains...
Subscribe to:
Posts (Atom)