Showing posts with label Tutorial. Show all posts

23 February 2013

Decoden! (in the process...)

Well, I decided to do some more decoden. I still had quite a lot of silicone 'whipped cream' from my last box. In this post I'm going to be showing pictures of how it looked as I made it, with a few tips and techniques.

So, I took this box that I got a long long LONG time ago when my dad bought me a watch (that I've definitely had since before I was thirteen because it has leather on it, nowadays leather makes me throw up). I tend to keep boxes like this because they're good for keeping stuff in, I use this one mainly for hair pins.
from the side :) I really like the pattern on this box, it's really
pretty!
Here comes the 3D paint! I'm using Tulip. I suppose this is like icing? I'm not exactly sure what I should call it. I painted some over the top, then painted some dripping down the sides.

As you can see, I didn't make the drips too big! I was frightened that if I did it would become another failure box :( Also, I need to leave some room just in case this box requires a ribbon. No, I don't decide to add a ribbon. The box does.

NOW FOR THE BEST PART!!!! (if you like piping chocolate stuff on your box, that is)

I've Improved lol! It looks a lot better than my last box. (feels proud) I suppose you could just leave it like this, but I'm putting cabochons on it. And rhinestones. Not to forget the pearls. Oh, and cane slices. Maybe even a few beads.
 Now, this is why you DO NOT try to attack Sapphire's crafts. I originally had a bow in the middle, but my sister decided to rip it off! So, she now knows very well why you don't try to destroy my Decoden. I ended up staying up really late to correct it... (yawns)


So this is what it looks like now I've cleaned the paint up a bit. I know very well that I could have waited until the morning to sort is out, but no. Of course not. 

So, anyway, I used all the same things that I used last time, except for one thing. I used some cabochons that I had made out of air dry clay. I used Fimo Air. I haven't tried any other types of air dry clay, but I really like this one. 

On another note, my mum decided to buy all this cereal.

Fortunately, I love cereal. With skimmed milk of course, anything else is just too creamy for me. Yes, I am a little strange, aren't I?

9 February 2013

Polymer clay Plumeria Flower tutorial (re-made!)

Real Plumeria flowers (I didn't make these lol)
So I've decided to re-make my tutorial on how to make Plumeria flowers! My first plumeria flower tutorial looks a bit messy to me now :( 

Here goes, then! You will need: clay (in one colour), a craft knife or blade, a teaspoon (that you will only use for clay) and chalk (or acrylic paint). You could also add a scent to make it smell all flowery and realistic.
1. First you need to condition your clay. You can either use your fingers, a pasta machine or a rolling pin. This part is probably the most important. Tip: If you're using white or light coloured clay, try not to touch it as much as you can. This will help keep the clay as clean as possible.

Optional: if you want, you can add a scent at this point. Just mix it in to the clay.

2. Roll out the clay and cut in to 5-6 pieces. Try to make them as equal as you can, but don't worry too much if some of the pieces are slightly bigger/smaller. Flowers don't all have perfect petals!

Here's pictures of how I did it: first I rolled it out, then cut it, and rolled each piece in to a ball.

3. Now for the fun part! Well, if you count squishing clay with a spoon as fun, at least.

This part is critical for giving the petals their shape! You have to squish the ball down and use the spoon to give it it's shape. When you pull it off of the back of the spoon, it will have a curved shape like the real petals. Do this with each individual ball.  Tip: if you don't have a teaspoon available (possibly because you need them for food), you can use your fingers and a paint brush. It's a little harder, but it can be done like that.

4. Now what you need to do is arrange the petals in to a flower shape. Use TLS or the Studio by Sculpey Bake & Bond Adhesive to stick the petals together.


5. This is optional, but I'll assume most people won't want to leave this bit out. You can either use chalk to add the second colour or acrylic paint (but you have to bake it first if using paint). Start by adding the colour in the centre, then use your brush to push it out. You can put in an eye pin now if you want.


Now blogger is annoying me... It won't let me add my picture how I want it to... lol. Anyway, I made a little mistake with that one, and used a brush I hadn't cleaned properly. So it went all sorts of crazy colours! All is not lost though - I can still paint it now it's baked! I'll add the picture later :D

Here's a picture of one I made a while ago (sorry for bad quality). I used purple chalk, then painted over the backs of the petals with white acrylic paint, so you can do something like that if you want!

27 January 2013

Ear Cuffs method 2

Hey, I bet you thought I was never going to make another ear cuff tutorial! Well, today we're going to learn how to make the really cool ones that connect to earrings! I'd just like to warn everybody and say: please make sure your piercing is 100% healed. New piercings rip easily, even after the initial 6 weeks. I guess it's especially easy to tear your earlobe with something like this! So please be careful, ok?

This is what it looks like so
far on my ear
We're going to start off by making a basic ear cuff, using the first method. I'm using a slightly different design and I'm using 16 gauge wire. You can use any design or thickness, as long as it starts with a loop and ends with a loop. If you like my design though, I don't mind if you use mine. Just try not to do it EXACTLY like mine please...


If you have some jewellery making earring studs like the ones in the picture to the right, congratulations! You've just made life LOADS easier, and can skip the first 3 steps! Tip: if you don't have pierced ears, you can use clip on earring findings!


1. We need to make the studs! As already mentioned, you can buy studs like these. I took some waste polymer clay and rolled it in to a ball. Then I actually took a clean, nickel free head pin and used it to make the post. I don't recommend doing this unless you're really sure you know what you're doing is safe, and won't cause you an infection (not all head pins are nickel free, the same thickness as normal earrings, etc). If you have some flat, jewellery making studs, use them.

2. Now you need to take a piece of wire and use it to make a short eye pin. Then you push it in to the clay and you're done!

3. Bake. You don't have to take the metal post or eye pin out.
4. While your stud is baking, you can do the next step! (of course, if it's not baking/you don't need to bake it, you still have to do this step lol!) We're going to put a jump ring through the lowest loop on the cuff. I'm using one of my larger jump rings. Now attach your chain. You need to make sure you have a good amount of chain, as this will connect to the stud. But not too much, or else you're going to just make it heavier and it just won't look as nice!

Now your cuff should look like this:
5. Oh, look! The stud part has finished cooking now! (I assume I will have startled at least one person by saying that lol) Now we're going to finish it up by attaching the stud! This part is simple: just use a jump ring to attach it to the chain.

Tip: If you have more than one piercing in your ear lobe, you can make a cuff with multiple studs connected to it. 

Ok, the next ear cuff tutorial I'll be making will be a little different! I'm going to be showing you guys how to make ear wraps, they're extremely similar to ear cuffs, but they sit behind your ear.

30 December 2012

Dragon Fruit cane

I love dragon fruit, or any exotic fruits really :) Unfortunately, I'm the only one in my family who likes them!

(picture found online)
Here's what they look like, in case you haven't seen one before. I know it might sound strange,but a lot of people I know have never even heard of dragon fruit! You eat them in a similar way to how you would eat a kiwi fruit: you basically cut them in half then take out the fruit. They taste quite similar to kiwi fruit, they're a little bland but sweet. The fruit has a soft and slightly slimy texture, but there's also lots of tiny seeds in fruit.
Anyway, I've only seen ones with white fruit before, but you can also get them with purple fruit. I don't know if they taste any different.


Now we've got that out the way, let's start with the tutorial! 

We're going to be needing the following colours: black, translucent, and a bright pink colour mixed with a little white.


Start by rolling out the black. then cut it in to equal size pieces.

What I did with the translucent clay, I rolled it in to a ball then flattened it out. Then I cut it in to quarters. I rolled out one of the pieces and used it for the centre. I put 4 rolls of black clay around it. Then wrap it up.
Keep doing this until you've used up all of translucent clay quarters.


Now we've finished making the fruit :) Now for the flesh. Take your pink clay and roll it out. Wrap it around the clay (or 'pack' the clay) and reduce it in to a cane (start by using your fingers to reduce/squeeze it down and after that you roll it).


Now you cut the ends of carefully with a good blade. Don't just push the blade down or you'll mess up your cane (typical beginner mistake!). Instead, sort of roll the cane with the blade as you push in through gently. 


And, you're done :D When you bake the slices, the white part will go translucent. Sorry, I don't have a picture of a baked slice just yet.

I don't recommend baking the cane unless you know what you're doing. If you want to use it for Decoden or nail art, I think it'll be best if you make as much slices as you think you'll need and bake them as normal.

16 December 2012

How to make eye pins

for beading, it's best to use head pins, because they have flat head (but you can get them with different shaped heads). For polymer clay charms, you can use either head pins or eye pins. It's probably best to use head pins on charms that are flat at the bottom, and I find it's best to make the eye at the top after you've baked it. 

To make the eye pin, or make an eye in the head pins, it's very simple. You need round nose pliers to do this, and if you're making your own eye pins, you need wire (preferably quite firm/hard wire) and wire cutters. 
You just basically take the wire and form a loop in the top of it. You can make lots at once, or make them as you need them. I usually make them when I need them, but you can do whatever suits you. 

If, like me, you think this style is way too boring, you can try my style of eye pin! :D
Sorry the quality is so bad, but you basically need to make your normal eye pin, then bend the wire back on itself to make another loop. After this, you make one more between the first two. This one is like the 'eye' where you will put through your jump ring or whatever else you want to put in. The wire should go away from the 'eye' after this. You can cut the end off after this, but make sure you leave a good amount of room on the eye pin so it has enough room to go through the clay charm or whatever else you want to use it for.

Tips on making eye pins stay in polymer clay!

You won't have this problem if you are using head pins, but you can't always use head pins. Some times, you can only really use eye pins. The only real problem is, they tend to fall out. Usually what I do, is I pull the eye pins out after I've baked the clay and put glue on the pin. But there's a better way :)

If you make the pin an L-shape before you put it inside, it shouldn't fall out.

After you've put it in, squeeze the charm around it so it stays in. This is quite a common trick to use, but it is very useful to know :)

3 November 2012

Toffee/candied/candy apples

This is probably one of the easiest polymer clay tutorials I've made so far :D

You will need light green polymer clay, a bamboo skewer or a toothpick, and wire cutters. To make the chocolate apple you need brown chalk and TLS (If you don't have TLS, you can paint it). For the toffee apple you can use watered down acrylic paint or clear liquid clay (such as Fimo Deko gel). In this tutorial I will be using the paint.

The apple

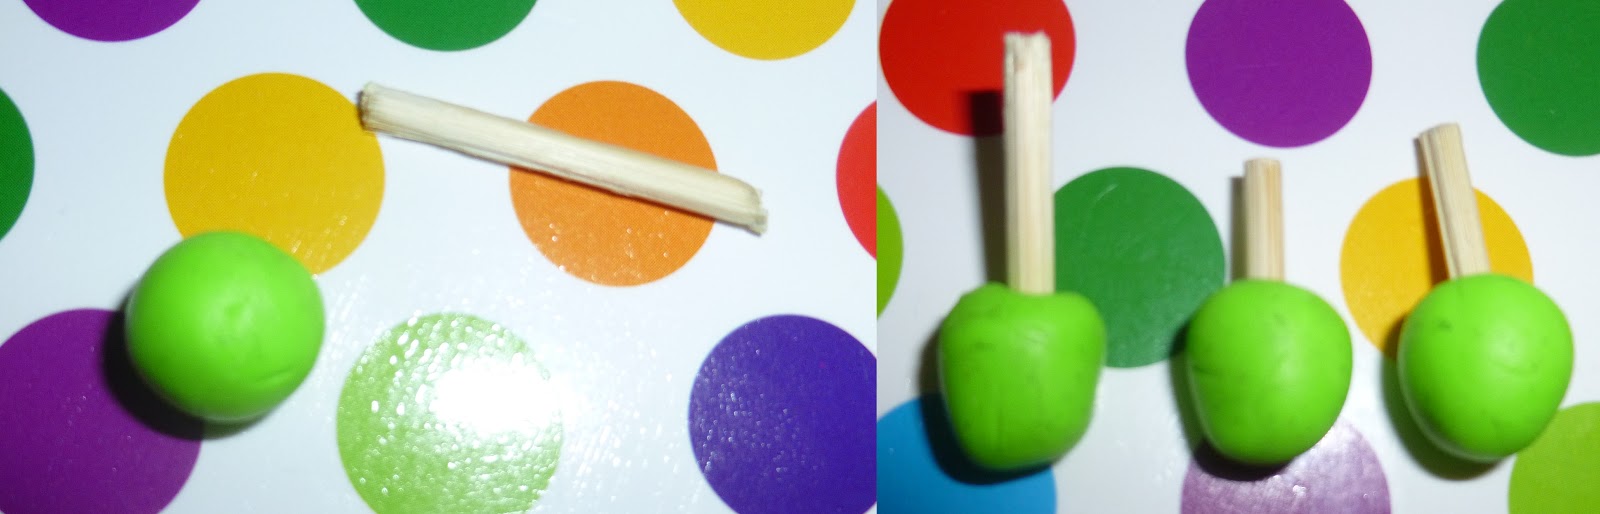
First, you need to condition the clay. Then roll it out and cut it in to equal pieces. After this, roll each piece in to a ball shape.
Click to enlarge :)
Use your wire cutters to cut a piece of your skewer/toothpick off. Push this in to the 'apple'. You will probably have to reshape the clay after this.
Don't worry if it's wobbly, we'll sort that out after it's baked :D
The chocolate

Mix brown chalk with TLS. It's very easy :) You want to do this on a scrap piece of paper, preferably one you've already used but don't need (Wasting paper is BAD!). Then, just dip your apple in it. Make sure it's nicely coated with chocolate, but leave a bit of green showing at the top.

If you're wanting to make a toffee apple, and you have fimo deko gel, now would be a good time to use it :) I don't have fimo deko gel, so I can't show you how. Sorry :(

Now you need to bake them according to the instructions on the packet.
One quick tip... The wooden part will probably not stay in the apple after baking. To fix this, take the skewer/toothpick out and cover  the inside and the wood with glue. Anything that dries clear will do :)

Toffee/caramel

You can also use this technique to make caramel, by using light brown paint. You want to water down some acrylic paint, don't add as much water as I did! Dip in your apple and leave it to dry.


NOTE: I haven't got any pictures of the finished product yet. Will upload them later in a separate post :)

7 October 2012

How to make Ear Cuffs: method 1


I love ear cuffs :) They're so cute, and you don't have to go through all the pain and after care that comes with a real piercing. All you do is put them on your ear and you're done.

I thought of several different ways to make Ear Cuffs, each method requires a strip of wire. You can add on beads, chains... If your ear piercing is 100% healed (be careful... newly pierced ears rip easily) you can join it all together using studs or tiny hoop earrings and it'll look really cute and unique :D
My ears look so weird lol!

In this tutorial, I'm going to show you how to make a relatively small cuff, like the one in this picture :)

Basically, all you do is make the design flat, and then use something round (such as a paint brush) to make it curved.


1. It's easier to draw your design out on paper first. Draw it in the way you want to make it. Curve your pencil around and DO NOT take it off of the paper. You might find you have to re-do it a few times :) But it will give you a good idea on how you want to make it. Tip: you want to start it with a loop and end it with a loop. You can make them whatever shape, as long as it makes a continuous loop that doesn't have any gaps. Remember, we start by making it flat.

2. Make your design.

You can thread on beads and make the design in whatever shape. Make sure it isn't too long, make it a little shorter that I made mine. Remember, it has to start with a loop of some sort, and end with some sort of loop. By the way: if your wire is soft enough, you might find it easier to actually use your fingers to form the shape of the wire.

3. Use a paint brush/pen to curve to design around.

You may find you have to use your fingers to change the shape so it suites it more.

And you're done :)
To put it on your ear, slide it on to the top of your ear where the cartilage curves around (I believe it's called the 'helix'), and gradually make your way down until you find it sits comfortably. For some people, you'll find it slides in to a comfortable position quite quickly. For others, it'll take a while to find that position where it fits nicely. It all depends on the structure of your ear.

I'm going to make some more tutorials on how to make ear cuffs. I'll show you how to add charms, stud earrings and chains...

30 September 2012

Polymer clay canes

I can't be bothered to make any tutorials today... But here are my canes :)

I'm going to make some tutorials on how to make some of them in the future. I hate people who buy them off of the internet! (No offence if you do!) They're so EASY to make. Yes that's right, you MAKE them.

Anyway, before I start myself on a rant, I've decided to make some tips on how I get my canes to work!

Another thing is: I don't bake them, I keep them in a box, It doesn't matter if the sides get dirty.

How to cut canes

At first, I started with circular ones because they're easier to slice. You have to roll the cane with your blade as you cut it, and then it shouldn't deform as badly. If you just push the blade straight through it, it might make the slices go a weird shape, and in some cases, the colours might mix. You don't want that to happen!
With square/rectangular canes, there isn't exactly loads you can do except push the blade through slowly. You might have to reshape the cane with your fingers every now and then. For triangular canes, such as the strawberry cane, slice it down from one of the points. Again, you might have to reshape the cane sometimes.

You can make heart shape canes too, but the problem is (see my purple heart cane), they might end up making a triangle shape. If you want, you can use clay to make the edges of the cane rounded so it's easier to slice.

20 September 2012

Shamballa style hoop earrings

In my Millefiori Shamballa Bracelet post, I mentioned that I wanted to make earrings like this. Since then, I've noticed that there aren't really a lot of tutorials like this at all... I haven't seen any at least (so I'm sorry if there are!). So I've decided to make this tutorial.

You can buy earrings like this on the internet. But it's so much nicer to make them :) (Plus it can be cheaper and you don't have to wait as long!) The only problem is, they're VERY heavy... But I suppose that would also be the case if you bought sterling silver genuine Shamballa beaded earrings off the internet.

Anyway, all you need to make these awesome earrings is memory wire (preferably bracelet sized), round nose pliers, wire cutters, Shamballa cord, jump rings and beads. I used left over cord from Shamballa bracelets.

You can enlarge the pictures if they're too small (which they probably will be!)

First you need the 'base' for the hoop earrings. Cut one hoop off of the memory wire and use your pliers to curl one of the ends of the wire inwards, so it makes a hoop shape like on the picture above.

Now for the fun/hard/artistic part - the square knots :)

Click to enlarge!

If you can't read what my writing says, basically what you have to do is thread your cord underneath the wire, bring the right side over the wire and under the cord on the other side. After that, you need to bring the thread on the other side under the wire and over the thread on the side we started with. It should make a sort of upside down pretzel shape, like in my picture. If you don't get it the first time, don't worry and DON'T give up. Once you learn how, it'll be super easy XD

Pull on each side of the thread until it makes this tight knot :)
Now we have to go in the opposite direction. Don't worry, it's loads easier than it sounds :)

Click to enlarge
I think you'll probably be able to understand it from this picture. It's the same, only in the opposite way. So rather than going over the cord, you go under the cord etc. 

Now you have to repeat these knots in the order I taught you them. Keep going until you think it's ready for the beads to go on :) (If your knots are twisting around like mine are, see the tips below. It's nothing to worry  about, it just makes the earrings look a little different)

You can either put all the beads on at once, or one at a time. 
As you can hopefully see in the pictures, I add each bead then tie a square knot. I don't pull too tightly, just enough so it looks like the bead is in a pink cage. If you want, you can add a bead, then make several knots, then add another etc. It would look good :) but I don't have enough cord...
When you come to the point where you don't want to add any more beads, tie several more square knots and cut off the excess cord. I find it's better to leave a tiny bit of cord at the end so you can glue it down and it won't come undone.

I hope you can see what I mean in this picture :)

OK, now we need to make it so we can attach a fish hook :)

use your pliers to curl the other end in to a hoop shape. Now open a jump ring and thread it through both 'hoops'. Close it, and it should look like the picture at the end.

Now all you have to do is add another jump ring and an earring hook.
And now finally... You're done :D Well, after you make one for your other ear, of course lol!

Tips

I'm not exactly sure why the knots tend to twist around when I make them... It seems to look nice to me, but I think most people would make it so it doesn't twist around. As I said, I don't exactly know why it does that, I'll definitely make a post about it if I find out :D

Remember, you can use whatever colours you want :) Try out different colours to find out what combinations  look the best. You can use as much cord as you want, too. You don't have to make it exactly how I made mine...