Showing posts with label Charms. Show all posts

9 February 2013

Polymer clay Plumeria Flower tutorial (re-made!)

Real Plumeria flowers (I didn't make these lol)
So I've decided to re-make my tutorial on how to make Plumeria flowers! My first plumeria flower tutorial looks a bit messy to me now :( 

Here goes, then! You will need: clay (in one colour), a craft knife or blade, a teaspoon (that you will only use for clay) and chalk (or acrylic paint). You could also add a scent to make it smell all flowery and realistic.
1. First you need to condition your clay. You can either use your fingers, a pasta machine or a rolling pin. This part is probably the most important. Tip: If you're using white or light coloured clay, try not to touch it as much as you can. This will help keep the clay as clean as possible.

Optional: if you want, you can add a scent at this point. Just mix it in to the clay.

2. Roll out the clay and cut in to 5-6 pieces. Try to make them as equal as you can, but don't worry too much if some of the pieces are slightly bigger/smaller. Flowers don't all have perfect petals!

Here's pictures of how I did it: first I rolled it out, then cut it, and rolled each piece in to a ball.

3. Now for the fun part! Well, if you count squishing clay with a spoon as fun, at least.

This part is critical for giving the petals their shape! You have to squish the ball down and use the spoon to give it it's shape. When you pull it off of the back of the spoon, it will have a curved shape like the real petals. Do this with each individual ball.  Tip: if you don't have a teaspoon available (possibly because you need them for food), you can use your fingers and a paint brush. It's a little harder, but it can be done like that.

4. Now what you need to do is arrange the petals in to a flower shape. Use TLS or the Studio by Sculpey Bake & Bond Adhesive to stick the petals together.


5. This is optional, but I'll assume most people won't want to leave this bit out. You can either use chalk to add the second colour or acrylic paint (but you have to bake it first if using paint). Start by adding the colour in the centre, then use your brush to push it out. You can put in an eye pin now if you want.


Now blogger is annoying me... It won't let me add my picture how I want it to... lol. Anyway, I made a little mistake with that one, and used a brush I hadn't cleaned properly. So it went all sorts of crazy colours! All is not lost though - I can still paint it now it's baked! I'll add the picture later :D

Here's a picture of one I made a while ago (sorry for bad quality). I used purple chalk, then painted over the backs of the petals with white acrylic paint, so you can do something like that if you want!

29 December 2012

Just a short update :)

I had a happy Christmas. Did you have a happy Christmas? I'll assume you answered 'yes' and say 'good'. Anyway, it's that awkward time of year now when you have no idea what to do because Christmas is mostly finished and it's the New Year next week (and also my birthday!!!).

So, anyway, you may be happy to know my conjunctivitis decided to leave me alone without even spreading to the other eye like it normally decides to do :) In fact, it didn't even hang around for that long. Only for about two days. I guess not touching it really does help... Also, eating a load of immune system-boosting oranges helps too! (Sorry, teeth.)

Moving on to something slightly more relevant, it's about this time last year that I discovered polymer clay. My mum got my sister a jewellery making kit with polymer clay in it last year. Not very good polymer clay at all - most of it didn't go hard at all after we baked it and it's still pliable now. Anyway, my sister ended up getting all frustrated with it (she was only 8!) and I ended up gaining a jewellery making kit with polymer clay in it. lol. I was already in to jewellery making, but I guess making polymer clay jewellery with my sister was what really got me in to jewellery making. Soon after that, I managed to get my hands on some real polymer clay (well, it was Sculpey III polymer clay, so at least close to real polymer clay) and I started off by making a few charms and earrings. Then my favourite craft shop got Fimo Soft clay in!
My first polymer clay earrings lol :) I cut them in half when I was making them
with scissors because I didn't have a blade or a craft knife lol!

A few tutorials I'm planning on making:
  • I'm going to make an updated version of my polymer clay Plumeria Flower tutorial. It's by far the most popular tutorial on this Blog! I think I could make a much better version of it now, though :)
  • I'm also going to have a go at making a Plumeria flower cane, but I don't know if I'll make it in to a tutorial or not.
  • More ear cuffs!
  • I'm planning on making a dragon fruit cane, because I love dragon fruit but there is a severe lack of tutorials for the canes :D
  • I'm currently going through an artistic-looking-earrings phase, so I'll be making a few tutorials on that.
  • I want to make some 'Kawaii' style charms... I'm not entirely sure what, though.
  • NYAN CAT!
(Btw, I know this is no longer a 'short' update!)

16 December 2012

How to make eye pins

for beading, it's best to use head pins, because they have flat head (but you can get them with different shaped heads). For polymer clay charms, you can use either head pins or eye pins. It's probably best to use head pins on charms that are flat at the bottom, and I find it's best to make the eye at the top after you've baked it. 

To make the eye pin, or make an eye in the head pins, it's very simple. You need round nose pliers to do this, and if you're making your own eye pins, you need wire (preferably quite firm/hard wire) and wire cutters. 
You just basically take the wire and form a loop in the top of it. You can make lots at once, or make them as you need them. I usually make them when I need them, but you can do whatever suits you. 

If, like me, you think this style is way too boring, you can try my style of eye pin! :D
Sorry the quality is so bad, but you basically need to make your normal eye pin, then bend the wire back on itself to make another loop. After this, you make one more between the first two. This one is like the 'eye' where you will put through your jump ring or whatever else you want to put in. The wire should go away from the 'eye' after this. You can cut the end off after this, but make sure you leave a good amount of room on the eye pin so it has enough room to go through the clay charm or whatever else you want to use it for.

Tips on making eye pins stay in polymer clay!

You won't have this problem if you are using head pins, but you can't always use head pins. Some times, you can only really use eye pins. The only real problem is, they tend to fall out. Usually what I do, is I pull the eye pins out after I've baked the clay and put glue on the pin. But there's a better way :)

If you make the pin an L-shape before you put it inside, it shouldn't fall out.

After you've put it in, squeeze the charm around it so it stays in. This is quite a common trick to use, but it is very useful to know :)

15 December 2012

polymer clay Christmas Cake

The cake originally said 'Merry Xmas' on it, but now all you can see is the 'merry' part. lol.

Ok, tomorrow I'll be showing you how to make my very weird looking eye pins. :) I've not seen them like that before, so I'm hoping I've come up with an ooak idea lol! The only problem is, I've been having a few issues with my computer (again). Maybe my computer will behave tomorrow!

9 December 2012

Christmas Lollipop jewellery :)

It's that time of the year now where everywhere you go is all Christmas-y and it takes about five hours to go shopping because there's so much people!

I know it's been done like a million times, but I decided to make some polymer clay lollipops :D

They're in Christmas colours :) Red, green, gold and translucent clay. I'm going to wear them on Christmas Eve, lol!

I haven't got round to making anything else yet, I've been a good girl and done lots of revising :)

I've decided to change the layout of the Blog, too :) I'm in a Christmas mood haha XD

3 November 2012

Toffee/candied/candy apples

This is probably one of the easiest polymer clay tutorials I've made so far :D

You will need light green polymer clay, a bamboo skewer or a toothpick, and wire cutters. To make the chocolate apple you need brown chalk and TLS (If you don't have TLS, you can paint it). For the toffee apple you can use watered down acrylic paint or clear liquid clay (such as Fimo Deko gel). In this tutorial I will be using the paint.

The apple

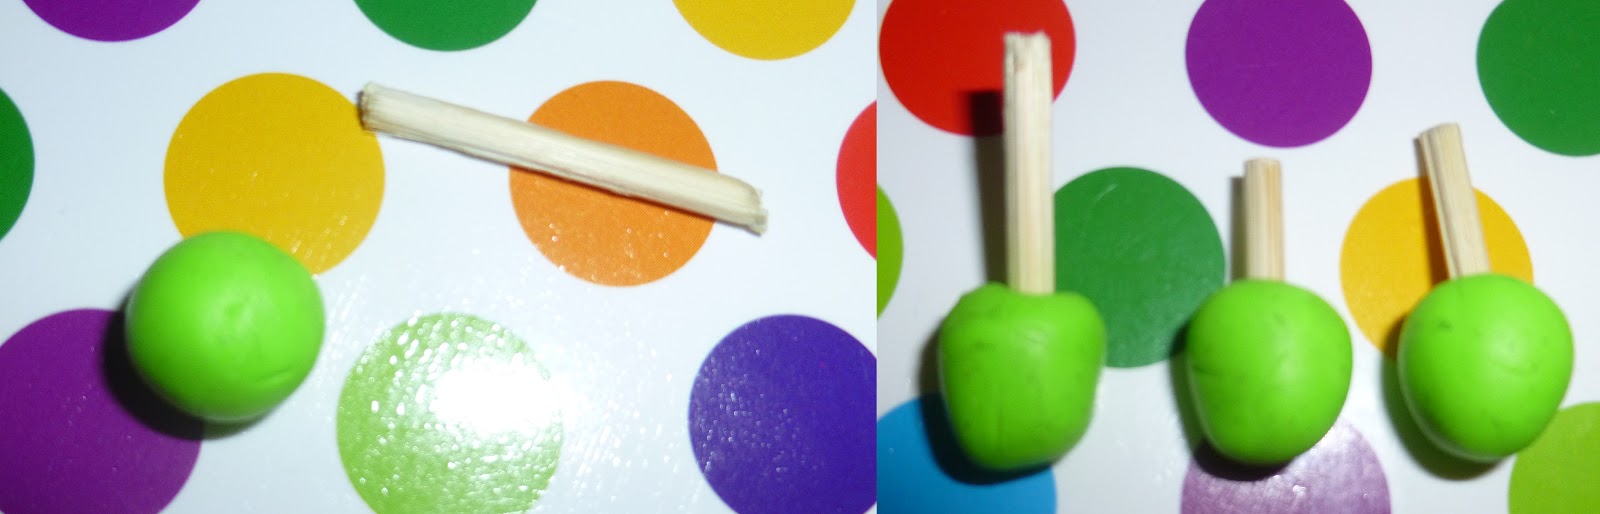
First, you need to condition the clay. Then roll it out and cut it in to equal pieces. After this, roll each piece in to a ball shape.
Click to enlarge :)
Use your wire cutters to cut a piece of your skewer/toothpick off. Push this in to the 'apple'. You will probably have to reshape the clay after this.
Don't worry if it's wobbly, we'll sort that out after it's baked :D
The chocolate

Mix brown chalk with TLS. It's very easy :) You want to do this on a scrap piece of paper, preferably one you've already used but don't need (Wasting paper is BAD!). Then, just dip your apple in it. Make sure it's nicely coated with chocolate, but leave a bit of green showing at the top.

If you're wanting to make a toffee apple, and you have fimo deko gel, now would be a good time to use it :) I don't have fimo deko gel, so I can't show you how. Sorry :(

Now you need to bake them according to the instructions on the packet.
One quick tip... The wooden part will probably not stay in the apple after baking. To fix this, take the skewer/toothpick out and cover  the inside and the wood with glue. Anything that dries clear will do :)

Toffee/caramel

You can also use this technique to make caramel, by using light brown paint. You want to water down some acrylic paint, don't add as much water as I did! Dip in your apple and leave it to dry.


NOTE: I haven't got any pictures of the finished product yet. Will upload them later in a separate post :)

2 November 2012

...

Yeah, I'm not sure what to call this post... Anyway, I haven't been in the mood to update this week. I've not exactly been myself lately. And my family has 'issues' with Halloween, lol!

One thing I'd like to mention, is the hurricane in America. I can't believe it's really happened. I thought the news people were making up stories, lol. Anyway, I've heard that the damage, especially in New York, is pretty bad. It's crazy, all the pictures we've seen on the news are the complete opposite to what people over here think of when they think of New York. I hope everything gets back to normal soon and that the damage to people's lives aren't that serious. I've never actually left the UK in my life (yet), and the worse thing I've ever seen is probably the flash floods and a relatively small earth quake that happened a few years ago, but nothing that compares to this. I can't imagine how people in America must feel :(

Anyway, on a more positive note, I made this necklace out of polymer clay because I love bats and it was Halloween!
I was going to make a tutorial for it, but I noticed it was way too similar to other tutorials I've seen. It's pretty much straight forward, too. Just draw your image on paper, cut it out and use it as a stencil to cut out your clay. Done :)


I know that most other countries don't celebrate it, but it's Bonfire night on Monday :) To my family, it's A LOT more exciting than Halloween. If you don't know what it is, it's basically a festival to mark the day when the houses of parliament were almost exploded, but the people doing it got caught (hence the fact we burn a little model of a person on a Bonfire). There are firework displays up and down the country, and they never seem to stop exciting people :D The only problem is, people tend to go crazy letting off fireworks (not in a potentially dangerous way!), and so the dog goes completely mad!

One more thing: sorry I haven't made any tutorials :( I felt that everything I'd come up with had been done. But I'll definitely be making some more soon :D

28 October 2012

Halloween charm bracelet

I made this charm bracelet :) It looks cool with all my other bracelets. It has glow in the dark ghosts, one has a moustache :D


I don't want to make any tutorials on how to make the charms because there are already lots of tutorials like this on the internet. In fact, parts of this bracelet were inspired by tutorials I've seen (I'm not going to lie)


27 October 2012

Polymer clay Halloween charms!

YAY! It's Halloween :) I noticed I got a CRAZY amount of hits when I made my last post saying I was going to make this, so I guess the pressure is on for me!

Warning: this post is NOT a tutorial! I'll be making a tutorial later!

This is basically a showcase of some of the polymer clay charms I've made to inspire people. I know by now  people have probably made everything, but I kind of forgot to make this earlier in the month :( Stupid me.

Polymer clay Dolly Mixture

Don't ask about the chocolate bar. I went a bit mad, ok?
In real life I hate dolly mixtures, lol. But they're so fun and easy to make :) I'm planning on making these in to a charm bracelet.

Table with sweets on it (creative title lol)
I had a bit of a creative moment and ended up making this :) It looks like the table at our house at Halloween. The reason why there's barely any sweets is because they all got eaten. (Actually it's because I couldn't be bothered to make any more. But if I say that, it'll ruin the moment.)

Scrap clay bats
I made loads of these out of scrap clay and painted some of them. The one at the bottom I just covered with glue and stuck rhinestones on. One fell off because I touched it before it had dried (silly me). Don't even ask why I put two holes in them. I thought it looked good :) The one at the top is actually broken, I tried to put a jump ring through one of the holes and it just wasn't working. Me being persistent, I kept trying to push it through. Oops.

CAKE!!!!
Just something I made with my sister :) It looks kind of cute though!

Completely unrelated to the subject: memory wire bracelet with semi-precious stones
Don't judge me, it felt lonely!
The title says it all. Completely off topic! But it looks nicer than the other bracelet, ha ha!

More posts coming later. Now, I will browse the internet whilst looking bored XD

22 September 2012

'Surprise' Polymer Clay Cake Charms


This is an idea I had a long long time ago :) I don't know if anybody has made anything like this but I had the idea to make a pie that was a cake on the inside. When I made it, I decided to make it in to a keyring for my bag, I used the wrong sort of wire by accident :( It fell off my bag, but I found it, so never mind...

I'm sorry, but I'm not going to make a tutorial on this a this point in time...

This is like a little present I made :) Just a blue cube of clay, wrapped up with a yellow strip of clay for the bow.


I decided to make a cake version of it too XD


The strip of clay broke off. D:
Oh, and I made a cupcake that's really a cake too....

16 September 2012

Polymer Clay Rose Tutorial

There are already a lot of polymer clay rose tutorials on the internet, but I'd like to share mine. I don't use any cookie cutters, just polymer clay and a craft knife/blade. When it's finished, you can add glitter glue to the petals so it has sparkle like the black ones on the picture.


You'll be rolling out the clay a lot, so you don't have to condition it that much :) If you have a pasta machine, it'll make it loads more easier, but I don't have one so I'm just going to roll it out really thin.


First, you need to either use a pasta machine or rolling pin to roll it out really thin. Don't cut the ends or anything so it's straight, leave it rounded at the ends so it adds to the effect. Now you need to use your fingers to roll the end inwards, like in the picture. While you do this, you need to pinch the end slightly so it makes a cone shape. This is the centre of the rose.

 After that, you need to cut that part off. Curl the top part of it (the part you didn't pinch) outward so it looks more like the petals of the rose.
Sorry it's blurred :(

Now you've made the centre, you need to make the rose petals to go around it.

There should be some clay left over from the first step. Cut it in to little strips and roll them in to equally sized balls. You need to then roll these out in to thin, long oval shapes. Each one will make two petals, so I suggest you only make one at a time. Now cut it in half.

You need to attach them to the centre like this:
I have no idea what happened to the edge of this picture...
Remember to curl the petals out at an angle so it looks more effective :)

As you add the petals, you'll find that the rose starts to take it's shape. Eventually, you'll get this:
You need to cut the end off (like in the third picture), then you're done :)

Tips

You can try making this in lots of different colours, using different colour glitter to 'glaze' it. Black looks really cool with red glitter :D I've even made a glow in the dark one, using the Fimo 'Nightglow' clay. They look awesome to use as jewellery, because it has a flat back you can make them in to a pair of cute stud earrings, you can put them on millefiori style pendants. You can add an eye pin to make it in to a charm. You could also use them for deco den, if that's what you're in to :).

You can put rhinestones on the petals too, I haven't tried it on the roses yet, but it looked cool on the plumeria flowers :)

26 August 2012

Polymer clay Plumeria Flower tutorial

EDIT!!!!: This tutorial is now out of date! I've re-made this tutorial. You can find the up to date version here.


These flowers are super easy to make. All you need is some clay in one colour for the petals, a craft knife/blade, colourful chalk pastels, a paint brush and a teaspoon (preferably one you don't need for food!).


Shaping the petals 
You'll want to start by rolling out the clay. You don't need to use bright pink clay, of course, but I've made them in a lot of other colours already.


Cut the clay in to five pieces, they don't have to be the exact same size, but make sure they're pretty much the same size. Now roll them in to little balls, they don't all have to be exact.
Now for the teaspoon :D You can use a dessert spoon if you're making a bigger flower, but again, make sure you don't need it for food!!!
Use it to squash down the clay and use your fingers to shape it in to a petal.

Note that it doesn't have to be a perfect petal shape, no flower is perfect!


Now you should have this shape :) You need to repeat it on all of the other petals. If you want, you can make a six petal flower or a four petal flower. Just make more petals now :D You can make as much as you like, but I like the five petal flowers the best.

If this technique isn't working for you, you can get petal shaped cookie cutters. Just roll out the clay and cut out your petals. Shape them and you'll get a similar effect. I don't use cookie cutters for clay though... I see it as cheating, to be honest :)


Adding another colour

You could just put the petals together to make the flower shape now if you want, but I like to use chalk to add another colour. You could also bake your flower now, then use acrylic paints. However, they leave a shine and flowers aren't shiny!
Take a scrap piece of paper and get out your piece of chalk and craft knife/blade.

Use your craft knife to scrape some chalk on to the bottom of the petal (the narrower part)


Now use your paint brush to spread the chalk so that you get a gradient effect.


Repeat on all the petals.

<


Making the flower shape

Now for the easy part :)


You can add some TLS/liquid clay to help the petals stick together.


Now you need to lay the petals over each other so you get the plumeria flower shape....


You could add a little more chalk, or add another colour, at this point. You could also add an eye pin (depending on what you're going to use it as). If you want to add one, put a little scrap clay on the back and put your eye pin through that. DON'T put it through one of the petals!

Now bake according to the instructions on the pack. I used Fimo clay, so I baked it for 15 minutes as it's only a thin piece of clay. As for the temperature, I live in the UK  and have a gas oven, so my oven doesn't use the same temperature as the US ones... I cook mine on gas mark 1/2 or 1.

Suggestions...

I've made these in lots of colours. The most effective so far that I've made are using white clay. I wanted to try it with the pink, this time! Try white clay with blue, pink or yellow chalk. If you want, use two colours. I also tried yellow clay with red chalk, and that came out really well.

Also, you could add little rhinestones, like on this one. They look a little like water droplets ;)


That's all, then :) My first tutorial lol XD! Next time, I'll try and make a shorter tutorial, but I wanted to get lots and lots of detail in.


You can find my new updated tutorial here.